The real estate industry is highly competitive, and traditional marketing channels no longer deliver the same results. Buyers don’t flip through property listings in newspapers or wait for hoardings to catch their attention. They’re online—researching, comparing, and shortlisting options before even speaking to a broker.
This is where Facebook ads for real estate developers make a difference. With over 400 million active users in India alone, Facebook (and Instagram, which runs on the same Ads Manager) allows developers to precisely target potential buyers, showcase properties with immersive visuals, and generate high-quality leads that convert into bookings.
This guide will take you step by step from setup to optimization, ensuring that your ad budget translates into actual site visits and sales.
1. Laying the Digital Foundation: How to Set Up Facebook Ads for Real Estate Projects
The strength of your campaigns depends on how well you set up your systems at the beginning. Developers often rush into running ads without fixing their foundation—resulting in wasted spend, poor tracking, and disorganized reporting.
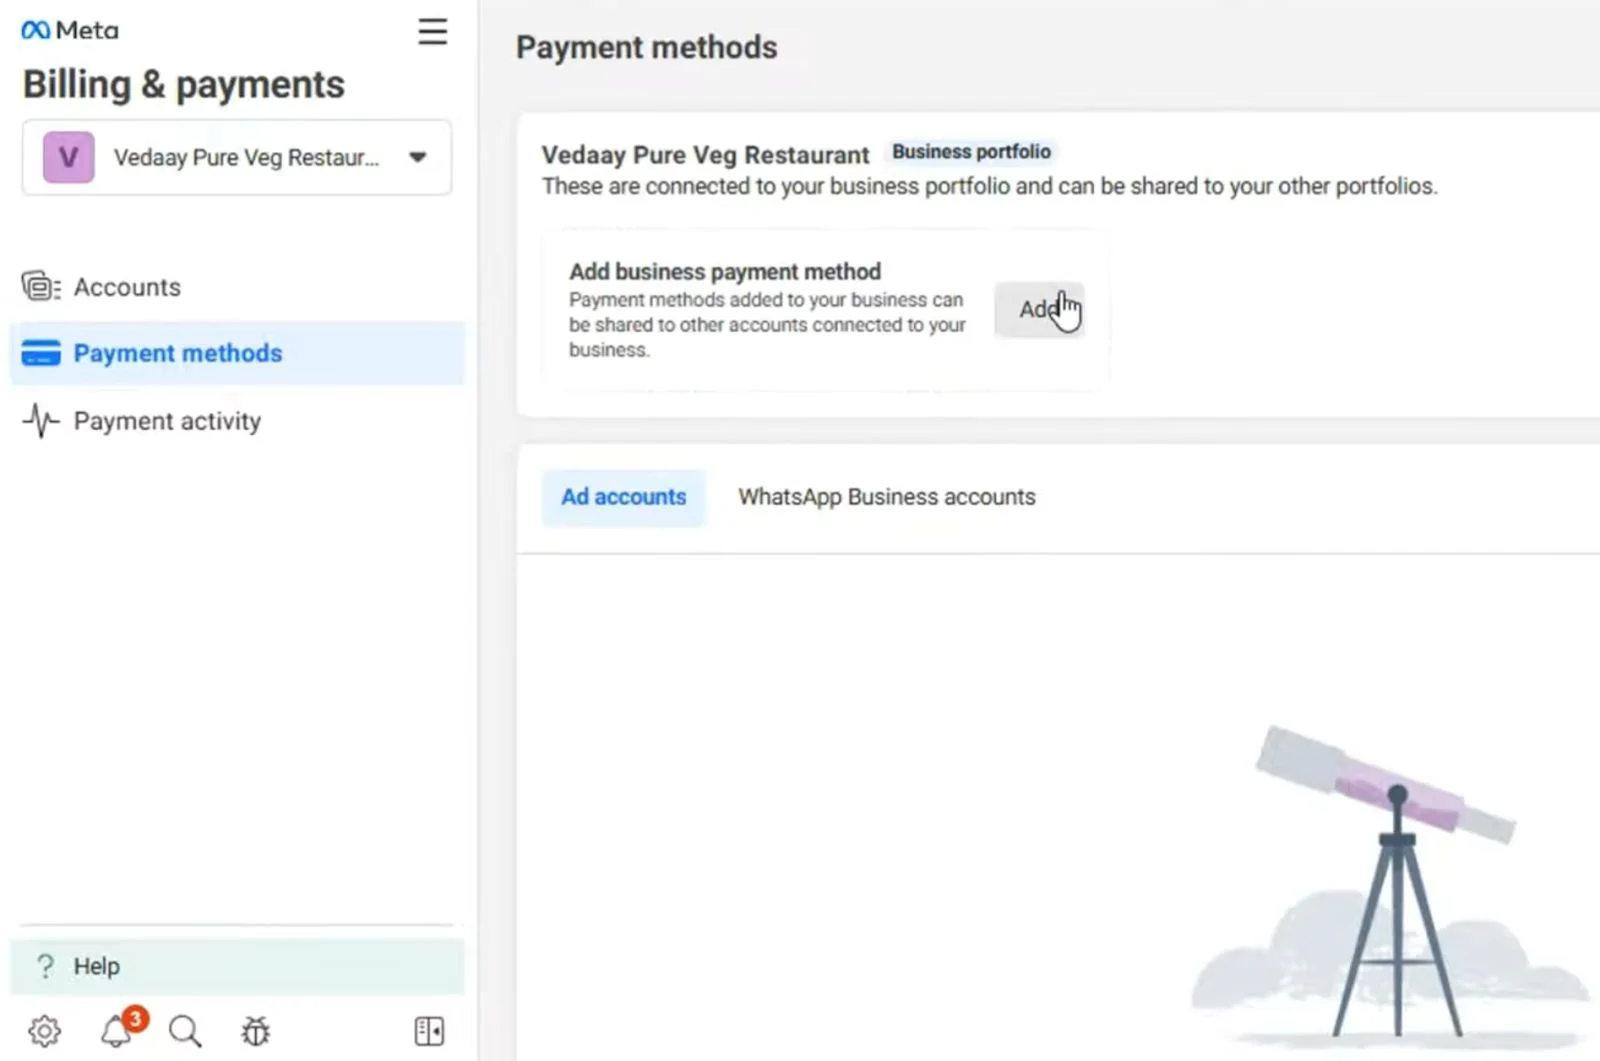
1.1 Creating and Optimizing Your Facebook Business Manager Account
Why Business Manager matters: Running campaigns from a personal profile or boosting posts directly is one of the most common mistakes in real estate marketing. Business Manager ensures structured control, transparency, and professional management of multiple projects.
Steps to set it up:
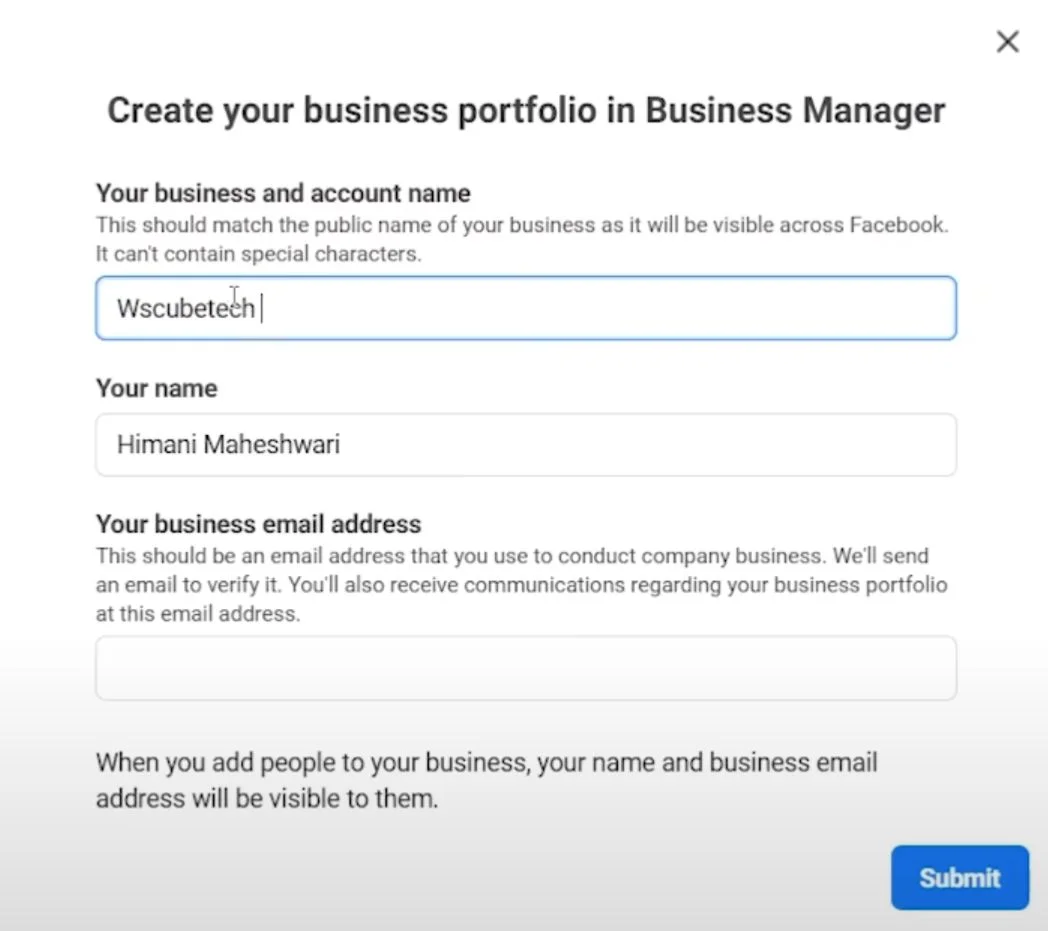
1. Create the account – Visit business.facebook.com and sign up with your work email. Avoid using personal Gmail accounts for ownership.
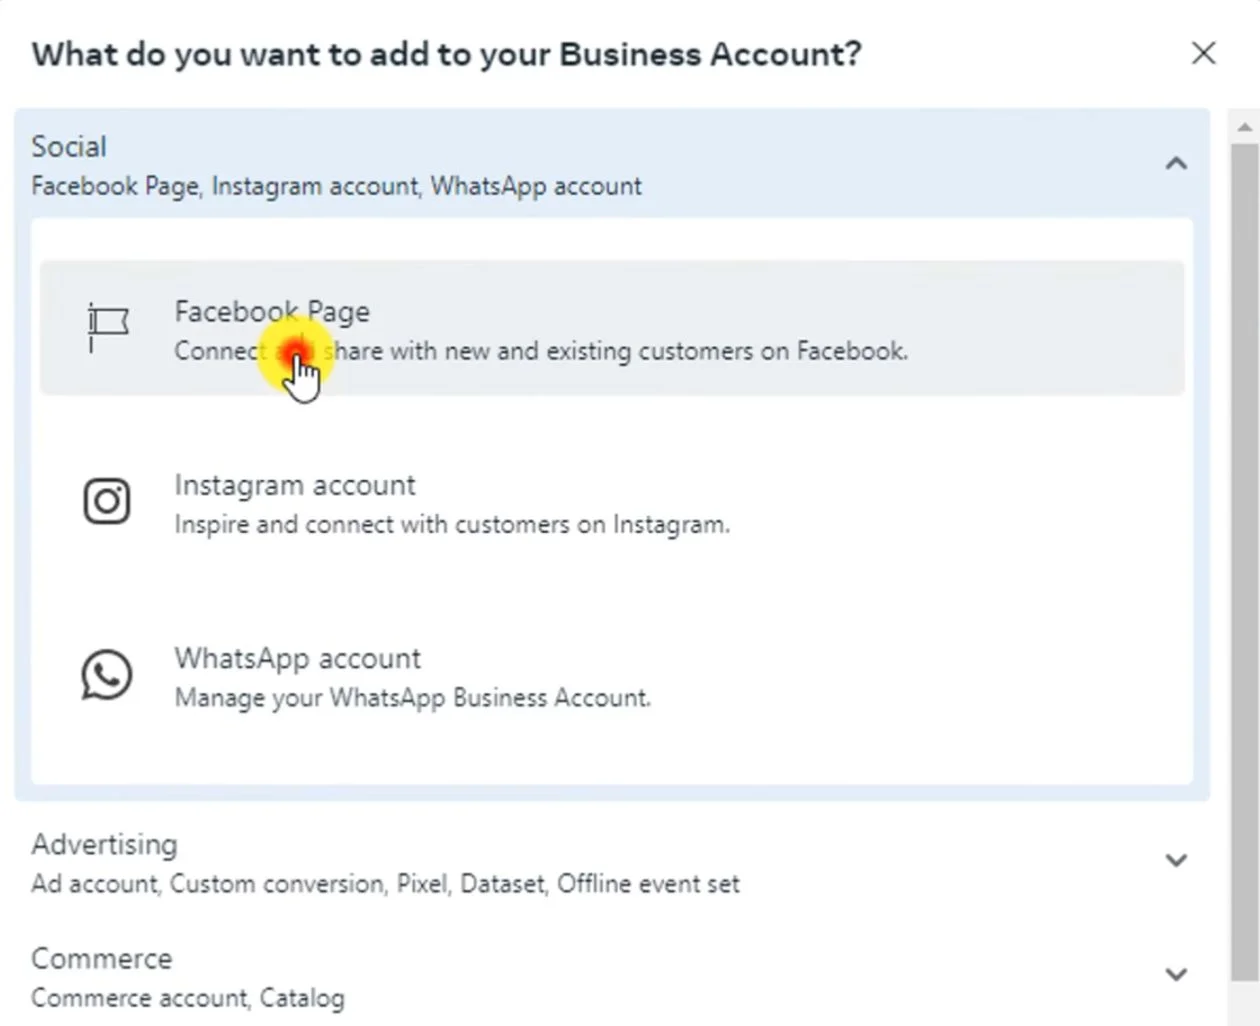
2. Connect your Page – Add your company’s official Facebook Page. This ensures all ads carry verified branding and prevent confusion for buyers.
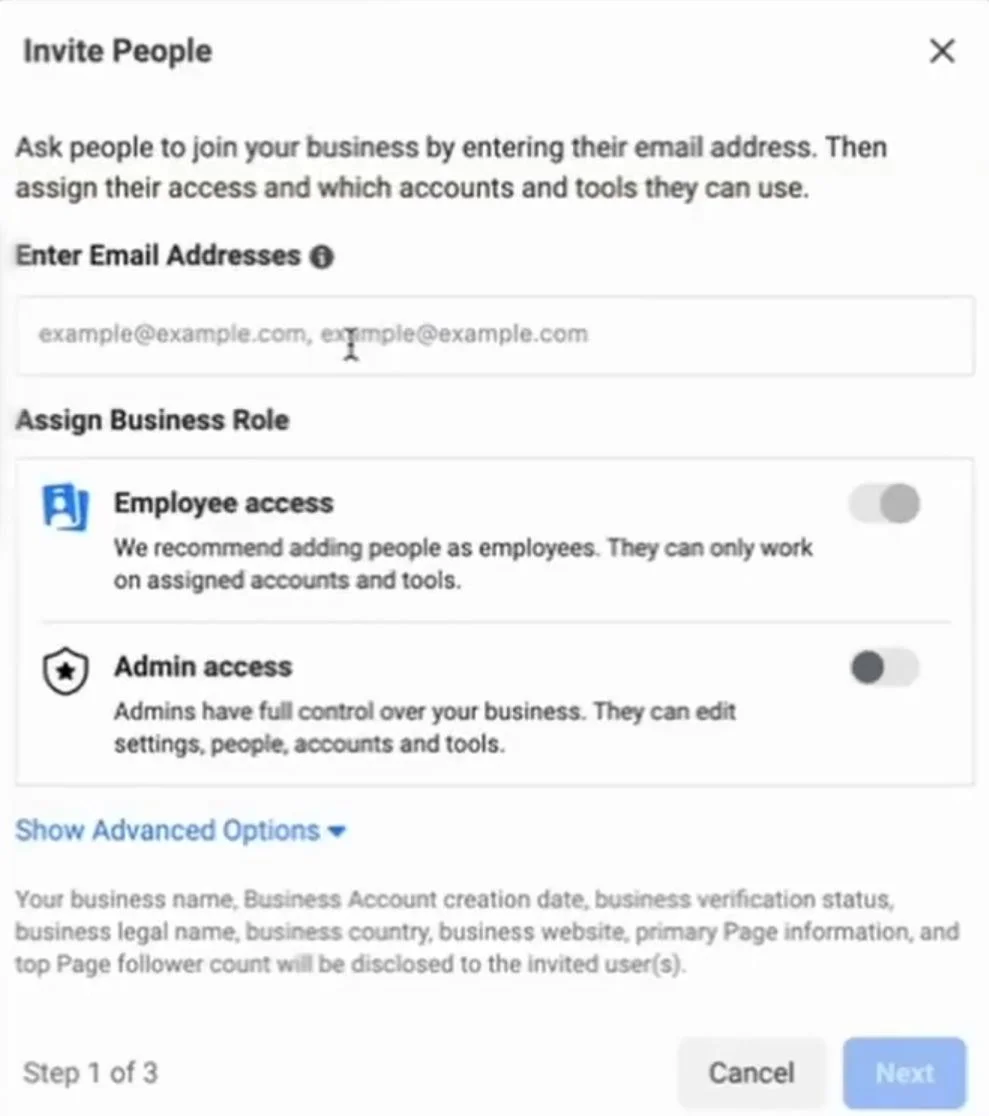
3. Add team members – Assign roles like:
-
Admin (agency or marketing head)
-
Advertiser (media buyers)
-
Finance analyst (accounts team)
This avoids sharing single logins, which can cause chaos when multiple projects are running.
4. Configure billing – Add corporate credit cards, prepaid balances, or UPI-enabled methods. Double-check your business details match your legal entity for smooth invoicing.
Pro Tip: If you’re handling multiple projects across locations, create separate Ad Accounts for each project within Business Manager. This keeps budgets, audiences, and reporting clean.
1.2 Installing Facebook Pixel and Conversion Tracking
Why Pixel is non-negotiable: Without a pixel, you’re running blind. Facebook Pixel allows you to see exactly how users behave after clicking an ad—whether they filled a lead form, downloaded a brochure, or booked a site visit.
Steps to install:
Step 1: Generate Your Pixel in Events Manager
-
Go to Facebook Events Manager.
-
Click “Connect Data Sources” -> “Web” -> “Facebook Pixel.”
-
Give your Pixel a name (e.g., Raheja_Juhu_Maestro_Pixel). Naming matters if you’re running multiple projects.
-
Enter your website URL when prompted. This allows Facebook to recommend easier setup methods.
-
Copy your unique Pixel ID (a 15–16 digit number).
Pro Tip: Create one Pixel per project/website. Developers with multiple projects often make the mistake of dumping all traffic into one Pixel, which ruins audience quality.
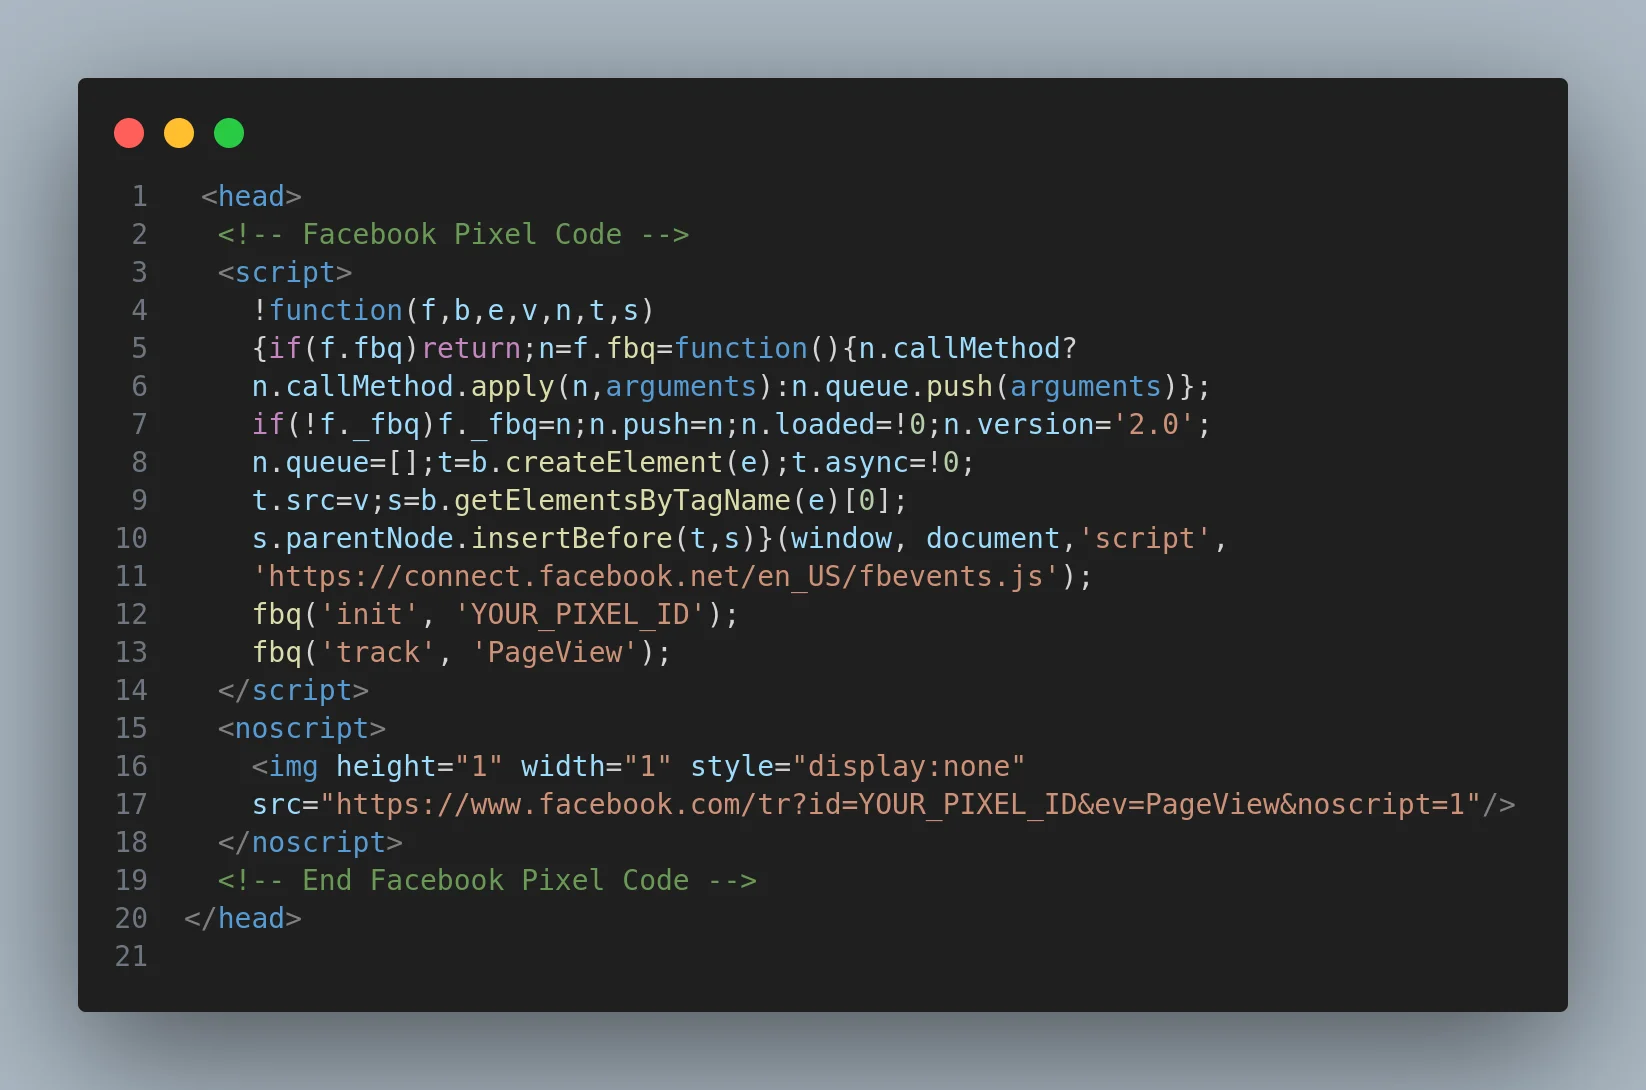
Step 2: Place the Base Code in the <head> Section of Your Website
-
Copy the base Pixel code from Events Manager.
-
Paste it between the 'head start and head end' tags of every page on your website.
Example: -
-
Replace YOUR_PIXEL_ID with the unique number from Step 1.
-
Save and publish changes.
Mistake to avoid: Many developers paste the code only on the homepage. It must be added site-wide (every landing page, thank-you page, floor plan page, etc.) for accurate tracking.
Step 3: Use Google Tag Manager for Easier, Centralized Tracking
If you don’t want to manually edit every page’s code:
-
Sign in to Google Tag Manager.
-
Create a new container for your website.
-
Add a New Tag -> Custom HTML and paste your Pixel code there.
-
Set the Trigger -> All Pages so the Pixel fires across the site.
-
Publish the container.
Why this helps:
-
One place to manage all scripts (Pixel, Google Analytics, Hotjar, etc.).
-
Easier for agencies handling multiple projects.
-
Avoids code errors while editing websites directly.
Pro Tip:If your developer keeps delaying Pixel installation, use Tag Manager-it takes minutes to deploy without relying on IT.
Step 4: Define Custom Conversions for Real Estate
Basic PageViews are not enough. You must tell Facebook what a “valuable action” looks like in real estate:
-
Lead Form Submission: Triggered when someone fills the inquiry form (e.g., “Enquire Now” button). Add Pixel code to the thank-you page, or set up an event in GTM to fire on form submission.
-
Brochure Download: Track clicks on “Download Brochure.” Buyers who download a brochure show stronger intent than casual visitors.
-
WhatsApp Clicks: Many Indian buyers skip forms and go straight to WhatsApp. Track button clicks with a custom event.
-
Site Visit Booking: This is gold. Create a conversion event when someone books an appointment on your website.
Pro Tip:Map these custom conversions to different funnel stages:
-
Brochure download = Mid-funnel
-
Site visit = Bottom-funnel This helps you run remarketing ads aligned to each stage.
Step 5: Test and Debug the Pixel
-
Install the Meta Pixel Helper (a Chrome extension).
-
Visit your site and check if the Pixel is firing (green checkmark).
-
Test every action:
-
Fill a form (should fire “Lead”).
-
Click WhatsApp button (should fire “WhatsAppClick”).
-
Download brochure (should fire “BrochureDownload”).
-
-
Check in Events Manager if these events are being received.
Custom conversions for real estate:
-
Lead form submission (inquiry forms on the website)
-
Brochure download (PDF downloads often indicate stronger intent)
-
WhatsApp click (buyers in India often prefer direct WhatsApp chats over forms)
-
Site visit booking(the ultimate mid-funnel conversion)
Testing: Use Facebook Pixel Helper (a Chrome extension) to confirm the code is firing correctly.
Common mistake: Developers often only track “leads” but miss mid-funnel actions like brochure downloads. These signals help Facebook optimize for higher-quality buyers.
1.3 Defining Campaign Objectives and KPIs
Real estate projects move in phases, and your objectives must align with where the project stands:
-
Pre-launch (soft launch): Focus on awareness and reach. Objectives: traffic, video views, engagement.
-
Launch: Aggressively collect inquiries. Objectives: lead generation and conversions.
-
Sales phase: Nurture leads with remarketing and retargeting. Objective: conversions and messages.
KPIs to Track in Facebook Ads for Real Estate
Developers
1. Cost per Lead (CPL)
Definition: The average cost you pay to generate one inquiry through Facebook ads (via form fill, WhatsApp click, or website inquiry).
Benchmark: ₹1,000–₹3,000 per lead in India (depending on project type).
-
Affordable housing projects -> ₹500–₹1,200 per lead.
-
Mid-segment apartments -> ₹1,000–₹2,000 per lead.
-
Luxury projects -> ₹2,500–₹5,000 per lead.
Why it matters:
CPL gives you a quick sense of how efficient your ad spend is. But on its own, it’s incomplete. Many agencies optimize for the lowest CPL without checking if those leads are even qualified buyers.
Example:
-
Project A (Luxury apartments): 100 leads @ ₹2,500 = ₹2.5 lakh spent.
-
Project B (Affordable apartments): 300 leads @ ₹800 = ₹2.4 lakh spent. At first glance, Project B looks better. But if only 10% convert to site visits, Project A might actually deliver higher ROI despite the higher CPL.
Pro Tip:Always cross-check CPL with lead quality—are they serious buyers, or are they just “price-checkers”?
2. Cost per Site Visit (CPSV)
Definition: The cost it takes to bring one prospect physically (or virtually) to a site visit after seeing your ads.
Why it’s more important than CPL:
In real estate, site visits = intent. A lead may casually fill a form, but if they take time to visit the property, their buying potential skyrockets.
Benchmark: CPSV typically falls between ₹7,000–₹15,000 depending on ticket size and location. For luxury projects, it may be ₹20,000+, but these visits often result in higher-ticket conversions.
Example:
-
Campaign generates 200 leads for ₹3,00,000 (CPL = ₹1,500).
-
Out of 200, only 30 come for site visits.
-
CPSV = ₹3,00,000 ÷ 30 = ₹10,000 per site visit.
This number tells you how well your marketing is working ith your sales team follow-up.w If your CPL is low but CPSV is high, your sales funnel needs fixing (poor lead qualification, slow follow-up, or weak nurturing).
Common mistake: Developers obsess over CPL while ignoring CPSV. The real question should be: “How much am I paying to bring one family to the property?”
3. Lead-to-Site Visit Conversion Rate
Definition: The percentage of leads who eventually turn up for a site visit.
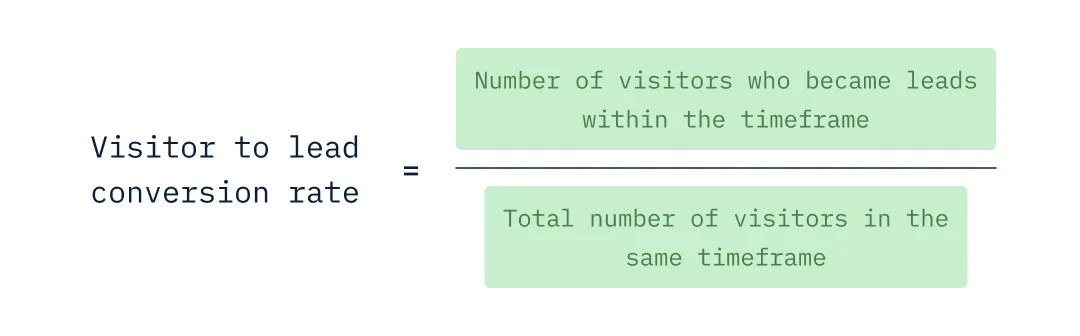
Formula:
Lead-to-Site Visit Conversion Rate=No. of Site VisitsNo. of Leads×100 ext{Lead-to-Site Visit Conversion Rate} = rac{ ext{No. of Site Visits}}{ ext{No. of Leads}} imes 100Lead-to-Site Visit Conversion Rate=No. of LeadsNo. of Site Visits×100
Benchmark: 10–25% for most residential projects.
-
Below 10% -> lead quality or sales process is broken.
-
15–20% -> healthy, well-qualified campaigns.
-
25%+ -> excellent targeting and strong sales team follow-up.
Example:
-
200 leads generated.
-
40 site visits achieved.
-
Conversion = (40 ÷ 200) × 100 = 20%.
Why it matters:
This KPI connects marketing to sales performance. If the rate is too low, either your ad targeting is pulling in the wrong audience, or your sales team isn’t nurturing leads properly.
Pro Tip: Track why leads drop off.
-
Did they not pick calls?
-
Was pricing too high for their budget?
-
Did they get ignored by the sales team?
Feed this back into your ad copy and targeting to refine future campaigns.
4. ROAS (Return on Ad Spend)
Definition: The revenue generated for every rupee spent on Facebook ads.
Formula:
ROAS=Revenue Attributed to AdsAd Spend ext{ROAS} = rac{ ext{Revenue Attributed to Ads}}{ ext{Ad Spend}}ROAS=Ad SpendRevenue Attributed to Ads
Why it’s the ultimate KPI:
CPL and CPSV are just costs. ROAS tells you if the campaigns are actually making money.
Example:
-
₹10,00,000 spent on Facebook ads.
-
Generated 1,000 leads -> 200 site visits -> 20 bookings.
-
Average booking value: ₹1 crore.
-
Revenue: 20 × ₹1 crore = ₹200 crore.
-
ROAS = ₹200 crore ÷ ₹10 lakh = 200x.
Even if these numbers sound extreme, the principle is clear: real estate has high-ticket sales, so even a small % of conversions can deliver massive ROAS.
5. CAC (Customer Acquisition Cost)
Definition: The total cost it takes to acquire a single paying customer (not just a lead or site visit). CAC goes beyond ad spend — it includes marketing + sales costs divided by the number of actual bookings.
Formula:
CAC=Total Marketing & Sales SpendNo. of New Customers (Bookings) ext{CAC} = rac{ ext{Total Marketing \& Sales Spend}}{ ext{No. of New Customers (Bookings)}}CAC=No. of New Customers (Bookings)Total Marketing & Sales Spend
Why it matters:
While CPL and CPSV show lead efficiency, CAC shows true business efficiency. For a developer, it doesn’t matter if a lead was cheap — what matters is how much it cost to close a sale.
Benchmark for Real Estate:
Industry best practice is to keep CAC around ~2% of the property value (ticket size).
-
Example: For a ₹1 crore apartment, your CAC target should be ₹2 lakh or lower.
-
For a ₹3 crore luxury apartment, CAC should ideally stay within ₹6 lakh.
This aligns marketing costs with profitability while ensuring scalability.
Pro Tip: Always set project benchmarks early. For example, if your average site visit conversion is 20%, reverse engineer how many leads and ad spend you need to hit sales targets.
2. Understanding and Targeting Your Real Estate Audience
No campaign works without clear audience strategy. Facebook has rich targeting, but developers must balance precision with compliance (since housing ads fall under the Special Ad Category).
2.1 Identifying Buyer Personas
Every project appeals to a different type of buyer. Analyze your sales data to map personas:
-
Luxury buyer– HNIs, C-suite professionals, NRIs. Motivated by exclusivity, sea-facing views, and branded residences.
-
Mid-income family– Dual-income professionals looking for space, schools, and connectivity.
-
Investor– NRIs, businessmen, or locals who value capital appreciation and rental yields.
-
First-time buyer – Millennials with financing readiness, seeking affordable but aspirational projects.
Creating tailored campaigns for each persona prevents waste. For example, a luxury sea-facing Juhu apartment ad will not resonate with mid-income families in Navi Mumbai.
2.2 Geographic and Demographic Targeting Strategies
Geographic strategies:
-
City-wide targeting – Target everyone in Mumbai or Pune if the project has broad appeal.
-
Radius targeting– Target 5–10 km around your project site for hyper-local impact. Perfect for affordable housing or walk-to-work buyers.
Demographic filters (within Special Ad Category rules):
-
Age: 30+ (most ready buyers fall in this range).
-
Language: English, Hindi, or regional depending on audience.
-
Income proxies: Target through interests like “Luxury lifestyle,” “High net worth individuals” (but keep in mind restrictions).
Compliance alert: Since real estate falls under Facebook’s Special Ad Category for Housing, you cannot target by income, ZIP codes, or exact job titles. Instead, use broad targeting + lookalike audiences.
2.3 Custom and Lookalike Audiences
This is where Facebook’s real power lies:
-
Custom Audiences - Import your CRM data (past buyers, inquiries) and retarget them with new projects.
-
Website Retargeting – Show ads to people who visited your landing page but didn’t inquire.
-
Engagement Audiences – Target users who interacted with your Facebook/Instagram posts, videos, or ads.
-
Lookalike Audiences Build fresh audiences based on your best buyers. Example: create a 1% lookalike of your top 500 investors.
Pro Tip: Retargeting ads typically deliver 2–3X better CPL compared to cold campaigns. Always run them parallel.
3. Creating Compelling Ad Content That Sells Properties
Ad creatives are where developers often succeed or fail. Your targeting may be perfect, but if your ad doesn’t grab attention, it won’t convert.
3.1 Writing Ad Copy That Converts
Formula for real estate ads:
-
Headline: “Luxury 3BHK in Juhu with Sea Views” -> highlight benefit upfront.
-
Body Copy: Use emotional triggers: “Wake up to the sound of the sea in a home designed for Mumbai’s elite.”
-
CTA: Strong, urgent, and clear → “Book Your Site Visit Today.”
Pro Tip: Always pre-empt buyer objections: mention possession date, RERA number, and financing options in the ad itself. Transparency builds trust.
3.2 Designing Visuals That Showcase Properties
Visuals should sell the lifestyle, not just the floor plan.
-
High-quality renders – Interiors, amenities, and aerial shots.
-
Video walkthroughs – 60-second vertical tours for Instagram Stories.
-
Influencer content – Human-led videos with real testimonials.
-
Carousel ads – Showcase multiple USPs: location, amenities, interiors.
Mistake to avoid: Using generic stock images. Buyers instantly spot inauthenticity.
3.3 Leveraging Social Proof
Real estate is a trust-heavy purchase.
-
Use customer testimonials in video or text.
-
Showcase developer awards and construction milestones.
-
Feature community lifestyle—parks, gyms, neighborhood cafes.
-
Encourage user-generated content from happy homeowners
For Real Estate Ad Strategies Checkout
Real Estate Ad Strategies for 2025: 9 Proven Tactics to Dominate Now4. Campaign Types and Bidding Strategies
4.1 Lead Generation Campaigns
Visuals should sell the lifestyle, not just the floor plan.
-
Use instant forms with qualifying questions (“Budget range?”, “Preferred possession date?”).
-
Offer gated content like floor plans, price sheets, or brochures.
-
Integrate forms with your CRM so sales teams get leads instantly.
4.2 Traffic and Conversion Campaigns
-
Drive traffic to a dedicated landing page, not the homepage.
-
Optimize for key actions: brochure downloads, WhatsApp clicks.
-
Run dynamic ads if you have multiple listings.
4.3 Awareness and Consideration Campaigns
-
Show construction progress videos to build confidence.
-
Promote events and open houses.
-
Highlight neighborhood lifestyle to sell beyond the property.
5. Monitoring and Optimizing Campaigns
5.1 A/B Testing for Performance Gains
A/B testing is the difference between running “ads that look good” vs. “ads that convert hard.” In real estate, where CPCs are high and competition is cutthroat, every small optimization can shave costs and multiply ROI.
What to Test:
-
Headlines -> Emotional vs. rational hooks. (e.g., “Own a Landmark Address” vs. “Book Your Sea-Facing Home in Juhu”)
-
Creatives -> Lifestyle-driven vs. amenity-driven visuals. (Families enjoying the clubhouse vs. panoramic skyline shots)
-
CTAs -> Curiosity-based vs. action-based. (“Unlock Your Investment Potential” vs. “Book a Site Visit Today”).
-
Forms vs. Click-to-WhatsApp -> Long form submissions vs. instant WhatsApp inquiries.
Audience Splits:
-
NRI vs. Local -> NRIs usually respond to investment-led storytelling and dollar-conversion ROI; local audiences lean toward aspiration and lifestyle positioning.
-
First-time buyers vs. HNIs -> Budget-conscious vs. brand-conscious messaging.
Execution Tip:Test one variable at a time (headline, creative, CTA) to know what truly drives results. Rotate tests weekly or bi-weekly, and kill underperformers fast.
5.2 Scaling and Budget Management
Once you know what works, scaling smartly is where real ROI kicks in.
Steps to Scale:
1. Double Down on Winners
Gradually increase spend (20–30% increments) on top-performing ad sets. Sudden jumps can break Meta’s algorithm learning phase.
2. Seasonal Budgeting
Allocate heavier spends during high-intent periods like Diwali, Akshaya Tritiya, Gudi Padwa — when home buying sentiment peaks.
During lull periods, pivot messaging toward investment opportunities instead of lifestyle.
3. Lifecycle Campaign Mapping
Pre-Launch: Build intrigue. Run lead-gen campaigns with teaser creatives (“A Landmark in the Making”).
Launch: Max out budgets. Highlight USPs, early-bird offers, and scarcity (“First 50 buyers get pre-launch pricing”).
Mid-Sales Cycle: Re-engage warm leads with retargeting. Showcase testimonials, construction updates, and location benefits.
Near Possession: Use urgency (“Last chance before price revision”) and proof-of-progress (site photos, walkthroughs).
Post-Possession: Reputation campaigns, highlighting handovers, happy families, and resale value potential to fuel future projects.
Budget Balance Rule:
60% -> Lead-gen campaigns
25% -> Retargeting (site visit push, WhatsApp nudge)
15% -> Brand campaigns (credibility, long-term presence).
Summary
Facebook ads for real estate developers work best when treated as a long-term growth channel, not a one-time experiment. From Business Manager setup to advanced retargeting, each step builds toward one goal: converting digital attention into real-world bookings.
The formula is simple: set up correctly, target sharply, create compelling content, monitor relentlessly, and scale strategically.
Frequently Asked Questions
Q: How much should real estate developers budget for Facebook ads?
A: Start with ₹2,00,000 – ₹4,00,000/month. This allows enough testing, scaling, and lead generation.
Q: What is a good cost per lead (CPL) in real estate ads?
A: ₹1,000 – ₹3,000 per lead is typical. Luxury projects may cost higher but yield better-quality conversions.
Q: How long before results appear?
A: Initial leads can come in 24–48 hours, but expect 2–4 weeks of optimization before consistency.
Q: Are there compliance rules for housing ads?
A: Yes. All housing ads fall under Facebook’s Special Ad Category rules, plus local RERA guidelines apply.
Q: Can Facebook ads work for commercial real estate?
A: Yes. Instead of families, the targeting shifts to investors, business owners, and corporates.